VirtualBox tutorial
Setup an Ubuntu Server virtual machine on Windows using VirtualBox.
Requirements
VirtualBox
Go to VirtualBox site and download latest installer.
During installation few dialogs will appear askying if you trust Oracle software: just hit yes.
Note also that your network interface will be restarted, so if you are downloading something else, your connection will be lost.
Bios setup
If you have an Intel processor and you want to run 64 bit operating systems you need to enter your BIOS and enable the Virtualization Technology feature.
Ubuntu
There are many virtual box images available for download, but I prefer to download an iso and install it from scratch.
Go to Ubuntu Server download page and get an iso image. Last stable version at the time of this writing is Ubuntu Server 14.04 LTS so I downloaded ubuntu-14.04-server-amd64.iso.
Folder structure
I use to create a folder C:\store\Software\VirtualBox\VirtualMachines where I put all my Virtual machines images as well as a C:\store\Software\Ubuntu folder where I store my .iso images.
Open File > Preferences > General dialog in your Oracle VM VirtualBox Manager to change the default path and point to your VirtualMachines folder.
Create a virtual machine
Just hit the New button and follow the wizard. VirtualBox is really user friendly!
I use to name it like the OS it contains, i.e. Ubuntu Server 14.04. Type is Linux, of course, and version is Ubuntu (64 bit).
Select a proper amount of RAM, according to your physical host. I use to put 1024MB.
I use to create a new 8GB virtual disc in VDI format dinamically allocated.
Pre-configuration
Iso image
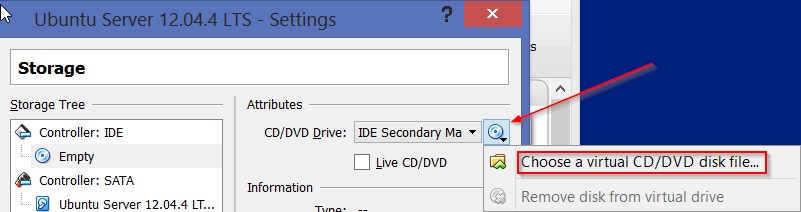
Once your VM is created and you downloaded the iso, before turning on the VM go to Settings > Storage > Controller: IDE , click on Empty and navigate to the iso path, that on my Windows laptop is C:\store\Software\Ubuntu\ubuntu-14.04-server-amd64.iso
Credentials
I use to take note of the user credentials in VM configuration, so in Settings > General > Description I write something like
user: io
password: ok
hostname: box
Disable audio and USB
I use to disable audio and USB before installation. They are enabled by default and are not necessary on a Linux server.
Networking
By default Network > Adapter 1 is enabled and Attached to NAT. That is enough to let the guest host see the Internet.
OS installation
Now you can boot your VM and start Ubuntu Server installation. Choose your language, configure your keyboard, etc. Follow instructions, it will be pretty easy: most of the times you can use defaults. Just remember to set the same hostname, user and password you chose in credentials section.
After installation completes, make sure to empty the CD removing the iso you set in the iso image configuration step. This is a good idea to avoid booting again into an installation or pointing to a missing path if you will move your VM to another host.
Install guest additions
Make sure you have gcc and kernel headers installed
sudo apt-get update
sudo apt-get install build-essential
sudo apt-get install linux-headers-$(uname -r)
Then attach the guest additions iso image, using menu Devices > Install Guest additions CD image
Now you can mount cdrom and install additions
sudo mount /dev/cdrom /media/cdrom
cd /media/cdrom
sudo ./VBoxLinuxAdditions.run
Tips
Add a shared folder
Go to menu Settings > Shared folders and configure a shared folder, named share for instance.
If you flag the Auto-mount option, Virtual box will mount it at boot on /media/sf_share/. Note that the folder will owned by root:vboxsf so you will need to use sudo to access it.
Of course you can mount it wherever, launching
sudo mount -t vobxsf share /path/to/shared/folder
Change screen resolution
Default terminal resolution is too small. To change it edit grub config
sudo nano /etc/default/grub
and put GRUB_CMDLINE_LINUX_DEFAULT="splash vga=792", then
sudo update-grub
sudo reboot
The vga=792 corresponds to a 1024x768 resolution: see ChangeTTYResolution in Ubuntu Official Documentation for parameters accepted by vga= flag.
Enable mouse
It can be useful have a mouse in your terminal, specially for cut and paste. Just install the gpm server
sudo apt-get install gpm